How can you make a CPU car drive around a track in a video game?
In an old school, top down racing game, how do you make the CPU drivers? They need to follow the track, have a variety of racing styles, and employ all of the driving mechanics the game offers, such as drifting.
After exploring this topic for a while, I decided to go with a simple waypoint system. This blog post series is basically what I wish existed before I started. I'm not an expert on this subject, and I'm not saying what I did was ideal or even correct. But I've now had good success getting artificial drivers to drift around my courses, so I thought I'd document what I learned and built.
Let's start with the heart of the system, waypoints.
What are waypoints?
At their simplest, waypoints are just points dropped onto the track that a CPU driver should drive towards. Once it arrives at the first waypoint, it will then start driving towards the next one.
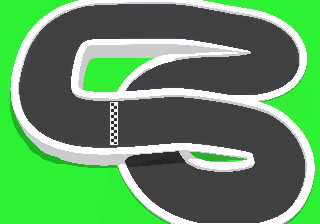
Here is the track this blog series will use,
and here it is with some basic waypoints plopped onto it
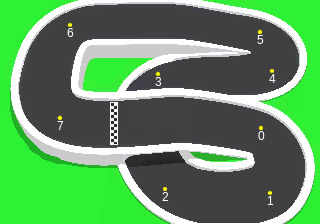
So if we just place a CPU car at the starting line, and have it drive towards 0, then 1, and so on, it will get around the track in a very primitive and unrealistic way. But hey, it's a start. Press play to see our amazing green driver in action.
The car keeps track of its target waypoint, and figures out the angle it needs to point straight at it
getAngleToWaypoint(): const waypoint = const x = waypoint .x const y = waypoint .y const angle = Math .atan(Math.abs(y) Math .abs(x));
if y >= // upper right quadrant return angle ; }
if y >= // upper left quadrant return Math .PI angle ; }
if y < // lower left quadrant return Math .PI angle ; }
// lower right quadrant return Math .PI angle ;}It then uses this angle to move forward
handleAcceleration() const airDrag = const acceleration = airDrag ;
this.speed Math .max(0, acceleration );
const cos = Math .cos(this.velocityAngle); const sin = Math .sin(this.velocityAngle);
this.velocity.x cos ; this.velocity.y sin ;
this.x this.y It also checks to see if it has arrived at the waypoint, and if so, sets up the next waypoint as its target
updateCurrentWaypoint() const currentWaypoint = const distance = this.x, this.y, currentWaypoint .x, currentWaypoint .y );
// are we going to arrive within one frame? // then consider us there if this.targetWaypoint if this.targetWaypoint } }}Here is the full code for this first basic driving car.
Turning towards the next waypoint
Let's improve our driver so it smoothly turns towards its target waypoint. This will be easier if waypoints have a radius added to them, so we can say we've arrived at a waypoint as long as we end up somewhere inside its circle.
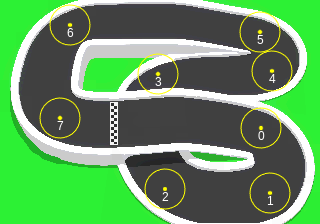
As soon as we arrive within the radius, the driver will target the next waypoint, and start to gradually turn towards it. Here is what we'll have
Well... it's kind of working (watch it go past waypoint 3 to see what I mean). This will get better, but for now let's look at how the smooth turning works.
In the first version, it was easy to point the car directly towards the next waypoint. Just figure out what that angle is and set the car to it. But when gradually turning instead, the car can either turn left or right. How do we know which way is correct?

In this simple example the car could turn right 20 degrees to point at the waypoint, or left 340 degrees. Both will ultimately get there, but obviously turning right is better here.
To figure out which turn is the better one, let's simulate turning a little bit in both directions and pick the one that pointed the car more closely at the waypoint.
Ok, but how to know which turn was better? Thankfully the dot product can tell us, which you may have learned about in a math class. The dot product is obtained by multiplying the x and y values of each vector and adding them together. The larger the dot product of two vectors, the more those two vectors are pointing in the same direction.
So simulate turning left a little, grab a dot product. Simulate turning right a little, and grab another dot product. Whichever dot product is larger, that's the way to turn.

How large should the simulated turns be? I tend to do a few degrees. Enough to make sure the dot results are different enough, but not too much such that the results become meaningless. What about the length of the turning vectors? I think it's best to avoid really long vectors. I tend to take the remaining distance to the waypoint and divide that by two.
And here is the code for doing this
type Point , b : Point ): return a .x b .x a .y b .y;}
calcTurnDecision(waypoint: Point ): TurnDecision { if // not moving? no need to turn return }
const distanceToWp = this.x, this.y, waypoint .x, waypoint .y ); const vectorMagnitude = distanceToWp / // translate the waypoint's center vector to be based // off the vehicle's location, so that the vectors // can be compared const translatedWaypoint : Point = x : waypoint .x y : waypoint .y };
let bestD = Number .MIN_SAFE_INTEGER; let bestTurnResult = for t = t >= t -= const turnedAngle = + const turnedCos = Math .cos(turnedAngle); const turnedSin = Math .sin(turnedAngle);
// form a new hypothetical velocity vector // based on the hypothetical turn const turnedVelocity : Point = x : vectorMagnitude * turnedCos , y : vectorMagnitude * turnedSin , };
// and calculate a new dot const turnedD = translatedWaypoint );
if bestD ) bestD = turnedD ; bestTurnResult = t ; } }
return bestTurnResult as TurnDecision ;}This code is just seeing if left, straight or right will get us closer to the waypoint, and returning the best result.
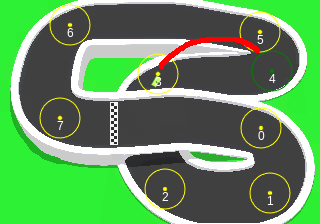
Here is that first smooth turning simulation again. The turns are still just as wild, but this time it also shows the turn decisions the car is making. The red line is the vector to the waypoint, the other lines are the simulated turns, with the thick green one being the one that was chosen.
Now that we know the direction of the turn, we need to know how much to turn in that direction.

We can see how much the car needs to turn by determining the angle between the car's direction vector and the vector from the car to the waypoint. This can again be accomplished by using the dot product. That is because the dot product of two vectors and the angle between those two vectors are related

Now we know which way to turn and by how much, we're getting there.
By noting how far the car is away from the waypoint, and how fast it is going, we can roughly determine how many frames it takes to arrive. By dividing the needed turn angle by that number of frames, we know how much to turn the car each frame. Turning this small fraction of the angle each frame is ultimately what accomplishes the smooth turning.
function a : Point , aLength : b : Point , bLength : const d = b ); const lens = aLength * bLength ;
return d / lens ;}
calcVelocityAngleChangeRate( waypoint : Waypoint , turnDecision : const distanceToWp = this.x, this.y, waypoint .x, waypoint .y );
const framesTillWp = (distanceToWp waypoint .radius) const translatedWaypoint = x : waypoint .x y : waypoint .y };
const normD = this.velocity, this.speed, translatedWaypoint , distanceToWp );
let velocityAngleSpan = Math .acos(normD) if Math .PI) velocityAngleSpan -= Math .PI; turnDecision = TurnDecision ; }
return framesTillWp ) turnDecision ;}When calculating framesTillWp, we are using the distance to the next waypoint, minus its radius. That is because we don't care about arriving exactly at the center of the waypoint, just arriving within its circular boundary.
Now with the turn rate in hand, we can move the car
update(waypoints: Waypoint []) // move onto the next waypoint if we have // arrived at the current one this.updateCurrentWaypoint(waypoints);
// grab the current waypoint const currentWaypoint = waypoints [this.targetWaypoint];
// figure out how much to turn each frame to smoothly // arrive at that waypoint const angleChangeRate = this.determineAngleChangeRate(currentWaypoint);
// update our turning accordingly this.velocityAngle angleChangeRate ;
// and move the car this.handleAcceleration();}
handleAcceleration() const airDrag = const acceleration = airDrag ;
this.speed Math .max(0, acceleration );
const cos = Math .cos(this.velocityAngle); const sin = Math .sin(this.velocityAngle);
this.velocity.x cos ; this.velocity.y sin ;
this.x this.y Here is the full code for the smooth turning car.
Fixing the wild turning
Ok that is all great, but if you play with the simulator above you can see the car drives like it's drunk. What's the deal?
In short, we don't have enough waypoints.
Let's look at going from waypoint 3 to 4 as an example
When it first arrives at 3, it's roughly going up towards the top of the screen, and 4 is roughly to its direct right. So to get to 4, the car needs to turn about 80 degrees or so. But when calculating how much to turn per frame, we take that 80 degrees and divide it by how far the car needs to travel. Since 3 and 4 are so far apart, it has all the time in the world to turn towards 4. This gradual turning combined with the car's travel results in the arcing motion that we're not fans of. What we really want is for the car to smoothly point at 4 pretty quickly, and then head straight at it. Adding more waypoints ends up being kind of a middle ground between our first naive implementation and what we currently have.
The easiest way to do that is just to add more waypoints, adjust their radiuses to make the car start turning earlier or later, and move the waypoints around. There's a lot of art behind waypoint placement.
With the new waypoints in place, it's not driving bad at all!
If you scroll back up to the calcVelocityAngleChangeRate code, we actually take the angle between the car and waypoint and bump it up a bit by multiplying it by 1.5. This goes back to waypoints being a bit of an art form. Sometimes you just gotta play around with things until they feel ok. By bumping up the angle a bit, we get the car to turn a bit sharper, and so its traversal around the track is more realistic as this helps increase the long spans of driving straight between the curves.
Conclusion
And with that we have a basic CPU car driving around our track. Not a bad start. In the next parts of this blog series, we'll look into adding drifting, more cars and avoidance, as well as slowing down to take curves more realistically.