Sometimes I build fully static websites but still want to collect some data from visitors. I don't want to bother with a server or 3rd party form services, so Google Drive can work in a pinch.
A Quick Demo
You can see the results here
Step 1: create a Google form
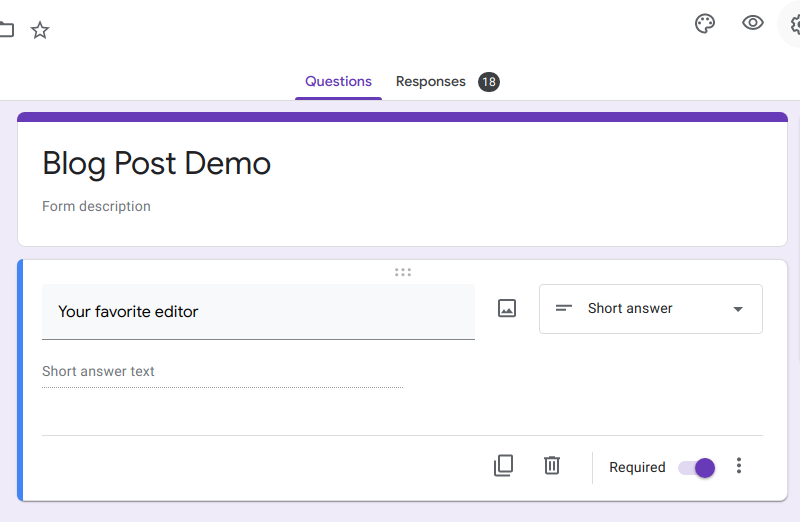
Create a form in Google Drive like always. It's best to avoid multi-choice questions, because when you send the data, it will just be a string anyway. In your actual form on your website, you can create a dropdown like I did above.
Step 2: figure out the names of each value
Each entry you add to the form has a name, it will be something like entry.123456789. The easiest way to get these names is to preview your form (click the  at the top of the page), fill it out, and submit it. Look in the network tab for the request that got sent to Google and there you will find the names you need
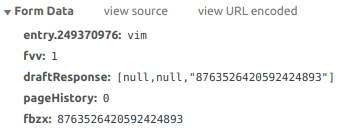
Don't worry about fvv, draftResponse, pageHistory, or fbzx. The only names you need are the ones in the form entry.*.
Take note of the form's URL as well
After you have submitted the form while previewing it, take a note of the URL. In the case of my demo form, it is https://docs.google.com/forms/u/0/d/e/1FAIpQLSegO8Qy4C6KrXa8x3wd7tW05xvDq6Qrv4_PNJOld_vIE3ipXA/formResponse This is where to send the data from your website (more on this below).
Step 3: build your form in your website
How you do this depends on how you build your websites. Here is the code I wrote for the above demo form in React
import React , useState } this is the URL noted just above const const setFormData ] [ENTRY_NAME]: }); const setHasSubmitted ] async React .FormEvent) e .stopPropagation(); e .preventDefault();
const encodedValues = Object .keys(formData).map((key) const encKey = const encValue = return });
const body = encodedValues .join('&').replace(/%20/g, try await method : mode : headers : 'Content-Type': 'application/x-www-form-urlencoded', }, body }); } setHasSubmitted(true); } }
let content ;
if content = <> <p>Thanks, like {formData[ENTRY_NAME]} too !</p> <a onClick ={() > show form again </a> </> ); } content = <form method ="post" onSubmit ={handleSubmit} action ={POST_URL} > <label htmlFor ="texteditor"> your favorite editor </label> <select id ="texteditor" name ={ENTRY_NAME} onChange ={(e) const val = e .target.value; setFormData((f) return ...f, [ENTRY_NAME]: val }; }); }} value ={formData[ENTRY_NAME]} > <option value ="Atom">Atom</option> <option value ="Emacs">Emacs</option> <option value ="Sublime">Sublime</option> <option value ="Textmate">Textmate</option> <option value ="vim">vim</option> <option value ="VSCode">VSCode</option> </select> <input type ="submit" value ="submit" </form> ); }
return <div>{content}</div> );}
export DemoForm };The above is set up so the form can be submitted whether the visitor has JavaScript enabled or not: the data is sent via fetch(), otherwise when JS is disabled it falls back to the standard form operations, due to the <form> having action and method set.
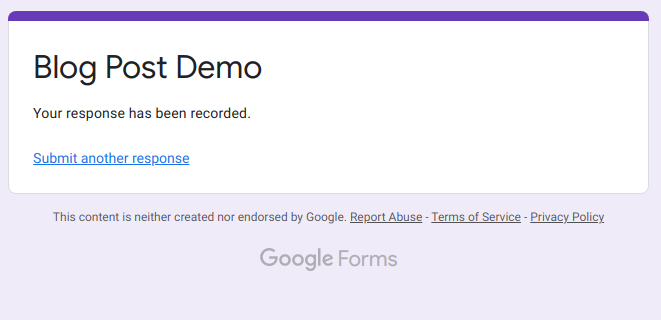
If a user does not have JavaScript enabled, once they submit the form, they will end up at Google's response page and no longer on your website
Depending on your site's audience none of this may matter. But if you don't want them to ever see this screen, a quick fix is to hide the form from JS disablers with <noscript>.
Limitations
A big downside to this approach is there is no way to know if the form submission succeeds or not. If you look above where I call fetch(), I have mode: 'no-cors' set. This is because Google has not enabled CORS for their forms endpoint. This means you can submit the data and Google will receive it, but you can't know anything about the request (ie whether it succeeded), it's an opaque box from your perspective. If you don't turn on mode: 'no-cors', then there will be an error shown in the dev console. This error is just informing you CORS is not enabled, even if you see the error the form data still gets sent. Basically turning on no-cors suppresses that error.
I only use this approach for casual stuff
I only use Google Drive in this way for side projects. If the form submission fails for whatever reason, I just don't get that info and I'm ok with that for less important stuff. If this data is important, you should find a more robust approach.
I like this because I hate spending money on side projects. With free approaches like this, I don't have to worry as much about keeping all my websites out there up and running.