Let's see how we can alter a game's graphics in part 2 of my Neo Geo ROM hacking guide.
Now with part 1 out of the way, let's get into some real ROM hacking.
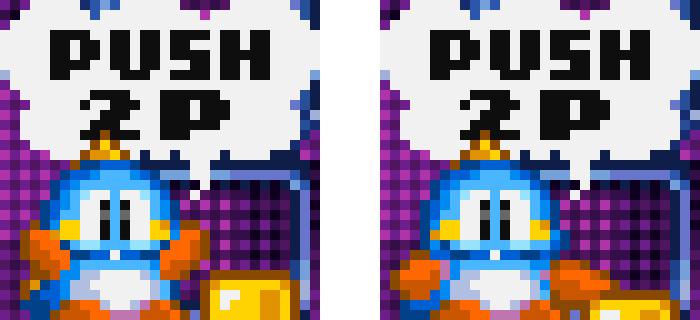
For this part, we will be changing what the blue dino in Puzzle Bobble says while a single player game is playing from "PUSH 2P" to "ROM HAK"
A super simple ROM hack for sure, but once you know how to change a single graphic tile (or in this case two), you can change any graphics you want.
Prereq: MAME
Make sure a recent version of MAME is installed on your machine and it is runnable from the command line, you can test that with mame -help
12:37 $ mame -help MAME v0.242 (unknown)Copyright Nicola Salmoria and the MAME team ...Set up the environment variable MAME_ROM_DIR to be the path to your MAME roms. For me, I have this in my .bashrc
export As a final test, mame -w aes pbobblen should launch Puzzle Bobble in MAME and play.
Prereq: NodeJS
The tools we are going to use are NodeJS based. You will need it installed on your machine. I am using version 18.18.2, but any recent version should work fine. You can install it from nodejs.org, or use a tool like nvm. As long as node --version on the command line spits out a version that is about 18 or higher, you're golden.
Then once installed, make sure Yarn 1 is installed too: npm install -g yarn. Yarn 2 and Yarn 3 will most likely not work.
Prereq: clone the ROM hack's repo and set it up
This post has a companion GitHub repo. Clone it locally to your machine.
Then from the repo's root, run yarn install.
We will also be using clownassembler, which has been copied into the ROM hack's repo at clownassembler/. Head down into that directory and run make. If all goes well, you will end up with a binary at clownassembler/clownassembler. Run it to confirm it is working
12:22 $ clownassembler/clownassembler clownassembler: an assembler for the Motorola 68000.
Options: -i [path] - Input file. If not specified, STDIN is used instead. If you don't have make, then unfortunately I can't help you as that will depend on your operating system.
Finally, copy pbobblen.zip from your MAME rom directory into the root of the ROM hack's repo. This should be a Puzzle Bobble ROM that works in your version of MAME. Here is the sha1 of the version I have, in case that helps
12:33 $ sha1sum pbobblen.zip 0e059a64ff45469c94d356c7b274dec8d251a121 pbobblen.zip If your sha is different, you might be ok, or might not be. I guess we'll find out :)
First, figure out which sprites are in use
OK now we are ready to start learning about the game so we can create our hack.
The Neo Geo has 381 sprites and they are used for almost all graphics, including the backgrounds. This dino is almost certainly made with sprites, so as a first step lets figure out which ones it is using.
Launch MAME and have it run the Lua script src/lua/spriteBoundingBoxes.lua, found in the ROM hack repo.
mame -w -nofilter -nomouse aes pbobblen -sound none -autoboot_script src/lua/spriteBoundingBoxes.lua -w will launch MAME in a window instead of full screen. -nofilter will keep the graphics crisp (totally optional), and -nomouse will prevent MAME from capturing the mouse (which is annoying).
You can also do
yarn mame -sound none -autoboot_script src/lua/spriteBoundingBoxes.lua which is just a small shortcut defined in package.json
I almost always turn the game's sound off with -sound none, but that's up to you.
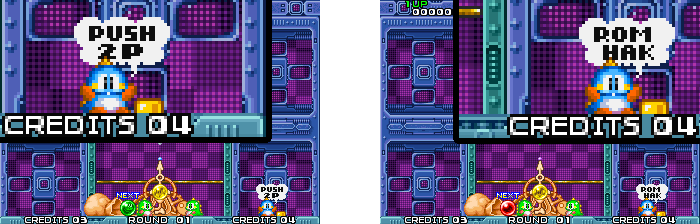
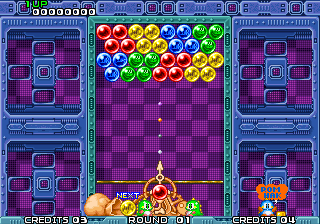
Now when the game is running, it will show all the sprites as colorful rectangles, and show each sprite's index too. Play the game until you arrive at single player gameplay and the dino on the right is on the screen. It will look like this
And we see that the dino is using sprites 355 and 356. Puzzle Bobble does a simple form of double buffering by using two different sets of sprites that alternate each frame. So while the game is running, the sprite indexes will change so fast they are hard to read. Pausing the game with p will let you read the sprite indexes. The other sprites are at 213 and 214. For this simple hack, it doesn't really matter too much which set we use.
Figure out which tiles the sprites are using
if you paused the game, you might have noticed some output in your terminal. This Lua script will dump some sprite info whenever the game is paused
function dump_sprite(213) dump_sprite(355)end
emu.register_pause(on_pause, It's currently set up to dump sprites 213 and 355, both being the left half of the dino. Pressing p to pause outputs this
--------------------Sprite: at (256,496), tiles tall tilespalettes----------------------------------------Sprite: at (256,696), tiles tall tiles 8b99 8b91 palettes 92 92--------------------On the frame I paused, sprite 213 was not in use, so it's 0 tiles tall and empty. But sprite 355 has the goods. This tells us the dino's graphics are made out of tiles in the CROMs at index 8b99 and 8b91. We can see that in the tile viewer
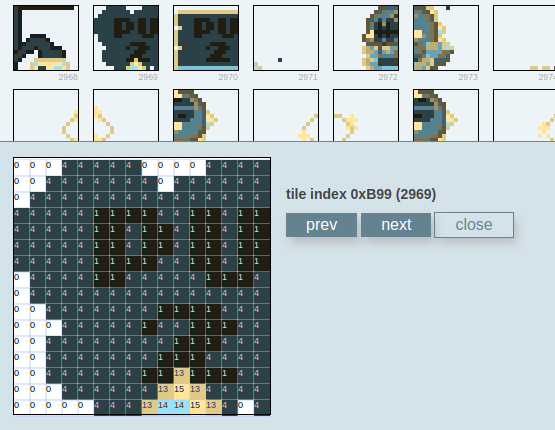
Here is how to load this tile in the tile viewer:
- Take
pbobblen.zipand unzip it somewhere - Head to https://neospriteviewer.mattgreer.dev/
- Click on "Choose Files" and then in the dialog choose
d96-02.c5andd96-03.c6 - Click on the upper arrows until you arrive at
2,048 - 3,071 - 8,192 tiles - The tiles are towards the bottom, index
2969(in decimal,b99in hex)
The reason the tile viewer says it is B99 and not 8B99 is because Puzzle Bobble has three sets of CROMs. We have loaded the third pair into the tile viewer. The tile viewer doesn't know this. The game will look at all tiles across all CROMs as one giant set, so the game says the index is 8B99. The tile viewer only knows about the tiles we have loaded, so it thinks the index is B99. Thankfully in hex, it's usually easy to make the jump. In Puzzle Bobble's case, just chop the 8 off the game's index.
Find the tilemap in the PROM
Now that we know what tiles are being used, let's locate the tilemap they are in, inside the PROM. The PROM is the main program ROM. It is what the Motorola 68k executes to run the game. So it will have game code as well as resources like level definitions, and in this case, tilemaps. A tilemap just specifies how tiles should be laid out to form a graphic.
Launch MAME with the debugger (mame ... -debug), then do a quick search of memory from the MAME debugger command line
find at 00E2D0 Found at 00E2F8 This tells MAME to search memory from bytes 0 to FFFFF (MAME always works in hex), and look for the word 8B99.
Only two locations?? Score! That is great news. Those are very likely the tilemaps we are interested in.
But wait, why did we just search memory? Didn't you just say the tilemaps will be in ROM? Isn't memory, RAM? They are, but fortunately for us, the Neo Geo maps the ROM into the 68k's memory map at 0 - FFFFF. So basically the ROM's contents are found in "RAM". It's still ROM though, you cannot change the values, they are read only. By doing find 0,FFFFF we searched the entire ROM.
Let's take a peak at E2D0. Open up the memory window (CTRL-M or open it from the Debug menu), and then enter E2D0 as the address.
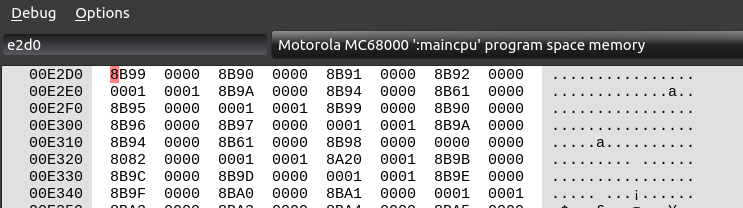
We can also do dump tilemap.txt,e2d0,10 to dump this part of memory into a file, which will look like this
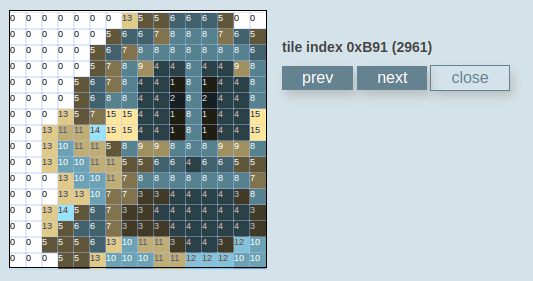
00E2D0: 8B99 0000 8B90 0000 8B91 0000 8B92 0000 Looking at the values, we see 8B99 where we expect it, as find already found it for us. Then a few words down we see 8B91. That's the other tile we know about. What are the zero bytes (0000)? Not entirely sure. We would have to reverse engineer the game more to understand what it does with those. But based on the values, this feels like a tilemap, and the tilemap we are after. It probably becomes this
| sprite | sprite || | || 8B99 | 8B90 || 8B91 | 8B92 |The four tiles form the dino and its speech bubble. We can look in the tile viewer at the other three tiles and yup, this is definitely the dino. For example, here is 8B91
But what about the other location, E2F8? We'll get to that later.
Confirm for sure it's really the tilemap
This feels very likely to be the tilemap we are after. But we still don't know for sure. Let's nip this in the bud with a Lua script. In the ROM hack repo is src/lua/tileInjector.lua. This script will prevent the game from using 8B91 when it goes to set it, and instead force it to use 866F. That tile is the base of the joystick from the how to play screen.
When we run the game with mame ... -autoboot_script src/lua/tileInjector.lua, we do in fact see the dino being replaced with the bottom of a joystick

Taking a look at the script itself, we can see how this is done. The script is intercepting whenever the game wants to send values over to video RAM. Which is how the Neo Geo does its graphics. Here is the imporant part:
INPUT_TILE if offset == REG_VRAMRW then local vri = next_vram_index next_vram_index = next_vram_index + vram_index_mod
if vri >= vri <= FIX_LAYER and -- this is an even write into SCB1 -- the LSBs of the tile if data == INPUT_TILE then return OUTPUT_TILE end end endIt's saying "hey the game wants to give this sprite tile 8B91" but since we are intercepting this, we are able to return a new value and force the game to use it, that is what return OUTPUT_TILE is. We tell the game "actually, set 866F instead". Causing the dino to be replaced with a joystick.
If you run Puzzle Bobble with this script, you will see the dino only gets replaced with the joystick every other frame. Why is that? Remember when find above found two locations? That is because this dino has two frames of animation. One where his hand is above the button, and the other where he is pushing it.
We are only replacing a tile from the first frame of animation, causing the flicker.
Get the sprite's palette
We've made a lot of progress. But before we can successfully change the graphics, we need the palette the sprite is using. This part is unfortunately a bit tedious.
On the Neo Geo, every tile that makes up a sprite can use a palette. Each palette has 15 colors (16, but the first color is always transparent). When looking at a tile in the tile viewer's detail window, there's a number in each pixel.
Those numbers indicate what color each pixel will be, by looking up that color in the palette. So when making our replacement graphics, it is important that the final tiles we inject into the game use the correct numbers, otherwise the colors will be all wrong.
Fortunately, the spriteBoundingBoxes.lua script not only dumped out the tiles, but the palette too
--------------------Sprite: at (256,496), tiles tall tilespalettes----------------------------------------Sprite: at (256,696), tiles tall tiles 8b99 8b91 palettes 92 92--------------------The dinosaur's tiles are using palette $92. What does that mean?
Palettes on the Neo Geo
Palettes are stored in RAM, and there is enough room for 256 of them. Each one has 16 colors, and each color is defined by a word (16 bits). So each palette is 32 bytes in size. When the game loads a sprite's tiles into video RAM, it also tells video RAM which palette to use. So when we say the dino's tiles are using palette $92, that means the $92'th palette (in hex, 146 in decimal) in palette RAM is where the colors can be found.
Palettes are found in the main 68k memory map starting at address $400000. With each palette being 32 bytes, we can determine palette $96 starts at address $401240: $400000 + $92 * $20, taking a look at that memory while our dino is in the game we see
401240: 0000 7ABD 7EEE 0048 106C 108E ....vfz.~..H.l..401250: 54BF 39DF 2C50 6F60 7B7A 2840 6D80 6FC0 T.9.,Po`{z(@m.o.That's our palette. The ROM hack's repo has a script, src/tools/txtPalToPngPal.ts. We can use this to convert the palette in memory into a 16x1 png.
First take the words of the palette in memory and just save them, by themselves, into a txt file, like this
0000 7ABD 7EEE 0048 106C 108E 54BF 39DF 2C50 6F60 7B7A 2840 6D80 6FC0 All I did was strip out the extra stuff and just leave the word data in the file.
Then do yarn ts-node src/tools/txtPalToPngPal.ts palette.txt, the result will be palette.txt.png, which looks like this (blown up)

The first color in the palette is black, but it's really transparent (the first color in all Neo Geo palettes is always transparent). Due to limitations in a tool we are about to use (my graphics tool, sromcrom, this tool is used internally by scripts in the ROM hack repo), we need to change that first color to pure magenta.

In the tile graphics tool, magenta represents transparency.
Now with that palette in hand, create the new graphics that will be hacked in. Just use whatever image editor you prefer. Here is the result of changing the speech bubble to say "ROM HAK".
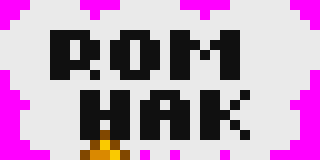
It's important to create this graphic using exactly the colors found in the palette png. This will allow the tile tool to properly assign the numbers. And anywhere you want transparency, use magenta (r:255, g:0, b:255) instead.
Now with our new graphics and palette in hand, we can make the patch.
But what if we want to change the colors? In other words, have the game use a new palette for our graphics? That is possible, but would require more sleuthing to figure out how Puzzle Bobble works with palettes. We'll explore some techniques that can help here in part three. But for now let's keep this hack simple.
Creating the patch
In the ROM hack's repo is a tool at src/patchRom. If you have done all the prereqs outlined above, this tool can be used with yarn ts-node src/patchRom/main.ts. But first we need to specify what our patch will be.
This tool takes in a json file that describes the patch. This is what it will look like
[ { "patchDescription": what the dino on the right side says in a one player game" }, { "type": "description": speech bubble now saying 'ROM HAK'" , "imgFile": "paletteFile": "destStartingIndex": }, { "type": "description": bubble tile indexes (first frame)" , "address": "patchAsm": $9c00" , $0000" , $9c01" , $0000" ] }, { "type": "description": bubble tile indexes (second frame)" , "address": "patchAsm": $9c00" , $0000" , $9c01" , $0000" ] }]It can also be found here
This patch file has three patch operations in it: one on the crom (graphics), and two on the prom (game program).
The crom one is pretty simple
{ "type": "description": speech bubble now saying 'ROM HAK'" , "imgFile": "paletteFile": "destStartingIndex": It's telling the tool to use dinoSpeechBubble_romHak.png (that we created just above), and dinoSpeechBubble_romHak_palette.png (which we also created just above, the palette with magenta in it), and create tiles out of them that will work on the Neo Geo. It's then saying to add those tiles into the game's CROM at index 9c00. By looking in the tileviewer, I know that part of the CROM is not used by the game, so we can add our own stuff into it without any issue. Here's what the tiles look like in the tileviewer after doing the patch

The tileviewer says they are at index 1c00, but this is really index 9c00 as we specified, since the tileviewer is looking at the third CROM pair.
Now with the graphic tiles in place, we can now patch the tilemaps in PROM to use these new tiles instead of the old. That's what the rest of the patch is doing
{ "type": "description": bubble tile indexes (first frame)" , "address": "patchAsm": "dc.w $9c00" , "dc.w $0000" , "dc.w $9c01" , "dc.w $0000" ]},{ "type": "description": bubble tile indexes (second frame)" , "address": "patchAsm": "dc.w $9c00" , "dc.w $0000" , "dc.w $9c01" , "dc.w $0000" ]}The first patch operation is saying "replace the data found at E2D0 with this new data". The patchAsm section is Motorola 68k assembly. dc.w is the instruction to tell the assembler to just write out some data (words in this case, hence the .w suffix). If you remember back when we found the tilemaps, they were located at E2D0 and E2F8. In both cases we are only replacing two tiles, the speech bubble. So we just need to swap out the first two tiles of each map.
Now let's run the patch and create our hacked game
yarn ts-node src/patchRom/main.ts src/patches/dinoSpeechBubble.json
Starting patch /home/matt/dev/pb-dino-hack/src/patches/dinoSpeechBubble.json Changes what the dino on the right side says in a one player game The speech bubble now saying 'ROM HAK' creating crom bytes for dinoSpeechBubble_romHak.png inserting crom data into croms at tile indexes: 9c00,9c01
applying patch speech bubble tile indexes (first frame )asm dc.w $9c00 dc.w $0000 dc.w $9c01 dc.w $0000writing asm to /tmp/rotary-bobble/asm/tmp.asm about to assemble ./clownassembler/clownassembler -i /tmp/rotary-bobble/asm/tmp.asm -o /tmp/rotary-bobble/asm/tmp.bin binary length 8replaceAt: asmBytes 9c 0 9c 1 patch speech bubble tile indexes (second frame )asm dc.w $9c00 dc.w $0000 dc.w $9c01 dc.w $0000writing asm to /tmp/rotary-bobble/asm/tmp.asm about to assemble ./clownassembler/clownassembler -i /tmp/rotary-bobble/asm/tmp.asm -o /tmp/rotary-bobble/asm/tmp.bin binary length 8replaceAt: asmBytes 9c 0 9c 1 to execute zip pbobblen.zip * adding: 068-c1.c1 (deflated adding: 068-c2.c2 (deflated adding: 068-c3.c3 (deflated adding: 068-c4.c4 (deflated adding: 068-v1.v1 (deflated adding: 068-v2.v2 (deflated adding: d96-01.v3 (deflated adding: d96-02.c5 (deflated adding: d96-03.c6 (deflated adding: d96-04.s1 (deflated adding: d96-05.v4 (deflated adding: d96-06.m1 (deflated adding: d96-07.ep1 (deflated to execute cp pbobblen.zip /home/matt/mame/roms/pbobblen.zip
wrote patched rom to /home/matt/mame/roms/pbobblen.zip patchRom will copy the hacked rom to where you have MAME_ROM_DIR set. Now you can just do mame aes pbobblen ... and see the hack in action.
yarn restore will copy the non-hacked version of pbobblen.zip back into your MAME directory.
But wait...
Can't we just have the hack replace the real "PUSH 2P" speech bubble graphics with the "ROM HAK" graphics in the CROMs? Yes we totally could. We could have had patchRom stick one tile at a time into the correct location in the CROM to replace the real graphics with our own. If we did that, the PROM patches would not be necessary. In this guide I did it with the PROM patches as in most real ROM hacks just replacing existing tiles won't always be feasible. Knowing about tilemaps and how to change them is useful info in general, so that's why we did it that way.
Also searching for the tilemaps got us started on using the MAME debugger and Lua scripting. In part 3 we will be doing "real" prom hacks, so all of this was a good warm up for that.
Conclusion
And that's it! From here it's pretty easy to change most graphics in Neo Geo games. Different games will all do their graphics a bit differently. So part of getting good at this is getting good at MAME's debugging tools to figure out what the patch needs to be.
All Neo Geo games use CROMs and they are always used in the same way. So that part of this hack will apply to any Neo Geo game. But the way games define tilemaps in the PROM will vary from game to game. You might even find a game that doesn't use tilemaps at all but has some other way of loading up the graphic tiles. That is why getting good at figuring out how a game works using MAME's debugger and Lua scripting is key.
These tools are super raw
I'm sure you noticed the tools are kinda hard to use. I built them to help me make rotary-bobble. They could use a lot of work to make them nicer. I figured I'd write this guide to help me remember how all of this works (I will surely move onto another project and forget!), and see if there is any interest in Neo Geo ROM hacking where we can make these tools nicer.
How to distribute the ROM?
Now that you have a Neo Geo ROM hack, how can you distribute it? Good question :)
Typically ROM hacks are distributed using a tool like like Lunar IPS and IPS files. But IPS files were only designed to patch one binary. They have been used for say Super Nintendo games, where the ROM binary is a single file. Neo Geo ROMs are a whole bunch of binary files in a zip archive. Even in just this simple hack we patched two CROM files and one PROM file. IPS is not ideal for this.
I am exploring a way to distribute Neo Geo ROM hacks. If you have any ideas or tips on this, let me know.
Part Three...
Part three looks at how to make logic changes to a Neo Geo game. See you there!